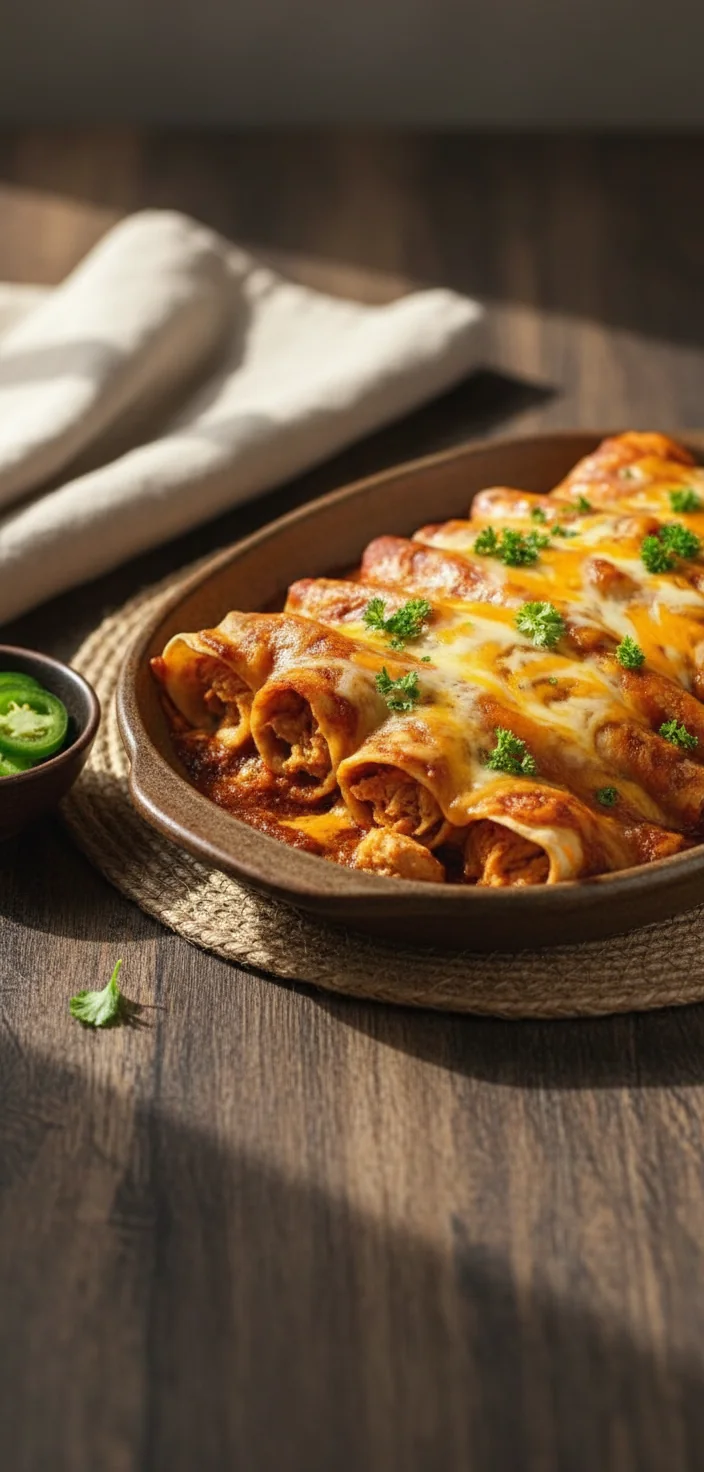
Enchiladas have been a staple in Mexican cuisine for centuries, with roots tracing back to the Aztecs. The word 'enchilada' comes from the Spanish word 'enchilar,' meaning 'to season with chili.' Traditionally, enchiladas were simply tortillas dipped in chili sauce, but over time, they evolved into the hearty, cheesy, and saucy dish we know today. This recipe stays true to those traditional flavors while making it easy for home cooks to create something truly special. The homemade red enchilada sauce is the star here, bringing depth and warmth that store-bought versions just can’t match.
Why You'll Love It
-
- The homemade red enchilada sauce is rich, smoky, and full of depth.
-
- Tender chicken and melted cheese make every bite comforting and satisfying.
-
- It’s a crowd-pleaser that’s perfect for family dinners or gatherings.
-
- The recipe is easy to follow, with simple ingredients you likely already have.
These chicken enchiladas are a game-changer! The homemade sauce is so rich and flavorful—my family asks for them every week.
Essential Ingredient Guide
- Chicken breast: Use boneless, skinless chicken breasts for easy shredding. Cook them until tender and juicy.
- Corn tortillas: Corn tortillas are traditional and hold up well to the sauce. Warm them slightly before rolling to prevent cracking.
- Homemade red enchilada sauce: The sauce is made with dried chili peppers, garlic, and spices. It’s the heart of this dish, so don’t skip it!
- Shredded cheese: A mix of Monterey Jack and cheddar gives the best melt and flavor. Use freshly shredded for the creamiest texture.
- Onion and garlic: Sautéed until soft, they add a sweet and savory base to the filling.
- Cumin and chili powder: These spices bring warmth and depth to both the filling and the sauce.
 Desserts & Baking
Blueberry Crumble Bars – Easy Homemade Dessert
Buttery blueberry crumble bars that are easy to bake and delightful to share.
Complete Cooking Process
-
Ingredient Readiness:
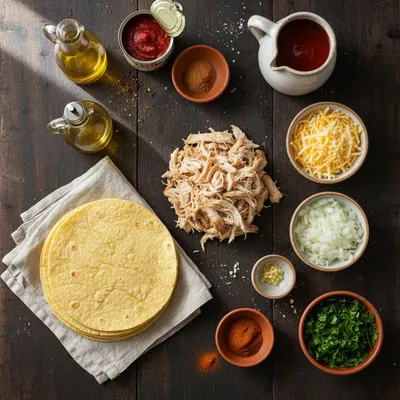
Start by cooking the chicken until it’s tender and easy to shred. While the chicken cooks, prepare the homemade red enchilada sauce by toasting dried chili peppers, blending them with garlic, spices, and broth, and simmering until rich and smooth. Warm the tortillas slightly so they’re pliable and won’t crack when rolled.
-
Flavor Development:
Sauté the onions and garlic until soft and fragrant. Add the shredded chicken, a bit of the enchilada sauce, and spices to the pan, letting the flavors meld together. This step ensures the filling is packed with taste.
-
Texture Control:
When rolling the enchiladas, make sure the tortillas are warm and soft. Spread a thin layer of sauce in the baking dish first to prevent sticking, then roll the tortillas tightly around the filling. Pour the remaining sauce over the top, ensuring every bite is saucy and flavorful.
-
Finishing Touches:
Sprinkle a generous layer of shredded cheese over the top of the enchiladas. Bake until the cheese is bubbly and golden, and the sauce is bubbling around the edges. Let them rest for a few minutes before serving to allow the flavors to settle.
-
Serving Timing:
Serve the enchiladas hot, straight from the oven. They’re best enjoyed fresh, with the cheese still melted and the sauce warm and inviting. Garnish with fresh cilantro, diced onions, or a dollop of sour cream for extra brightness.
-
Toast the dried chili peppers for the sauce just until fragrant—don’t let them burn, or the sauce will taste bitter.
-
If the tortillas crack when rolling, warm them for a few more seconds between damp paper towels.
-
For extra flavor, add a pinch of Mexican oregano to the sauce.
-
Make the sauce ahead of time and store it in the fridge for up to a week—it only gets better with time.
Pro Tips
This dish is all about layers of flavor. The homemade sauce is what really sets it apart, so take your time with it. I remember the first time I made it, I was amazed at how much deeper the taste was compared to anything from a can. And don’t worry if the tortillas tear a little—it’s all going to be covered in cheese and sauce anyway. The key is to keep the filling moist and the sauce rich. Once you pull that pan out of the oven, with the cheese all bubbly and golden, you’ll know it was worth the effort. It’s the kind of meal that brings everyone to the table, eager for that first bite.
The essence of the dish:
What makes these chicken enchiladas special is the balance of textures and flavors. The tender, shredded chicken contrasts with the soft, saucy tortillas, while the melted cheese adds a creamy, rich finish. The homemade red enchilada sauce ties it all together with its smoky, slightly spicy depth.
A fun fact or historical angle:
Enchiladas date back to Mayan times, where people would roll tortillas around small fish. The Spanish later introduced new ingredients like cheese and different meats, evolving the dish into what we know today.
Flavor or sensory focus:
The first thing you’ll notice is the aroma—warm spices, toasted chili peppers, and melted cheese. When you take a bite, the sauce is rich and slightly smoky, the chicken is tender, and the cheese adds a creamy, comforting finish.
You Must Know
-
The sauce is everything—don’t rush the toasting and simmering steps.
-
Warm tortillas are key to easy rolling and preventing cracks.
-
Let the enchiladas rest for 5-10 minutes after baking to set the sauce and cheese.
Frequently Asked Questions
→ Can I use flour tortillas instead of corn?
Yes, but corn tortillas are traditional and hold up better to the sauce. If using flour, warm them well to prevent sogginess.
→ How spicy is the homemade sauce?
The sauce has a mild to medium heat, depending on the chili peppers used. Adjust by removing seeds or adding fewer peppers for a milder version.
→ Can I make this ahead of time?
Absolutely! Assemble the enchiladas, cover, and refrigerate for up to 24 hours before baking. You may need to add a few extra minutes to the baking time.
→ What’s the best way to shred the chicken?
Use two forks to pull the chicken apart once it’s cooked. For easier shredding, let it cool slightly first.
→ Can I freeze these enchiladas?
Yes, they freeze well. Bake as directed, let cool, then wrap tightly and freeze for up to 3 months. Reheat in the oven until warmed through.
→ What can I serve with these enchiladas?
Try serving with garlic parmesan pasta, a simple salad, or refried beans. A side of guacamole or sour cream is also delicious!
Nutrition Facts
per serving
450
Calories
35g
Protein
30g
Carbs
22g
Fat
Taste Profile
Rich, smoky, and comforting with a balanced blend of spices and cheese.
Ingredient Substitutions
Don't have an ingredient? Try these alternatives
Adjust cooking time as needed for different meats.
Warm them well to prevent sogginess.
Recipe Variations
Try these delicious twists on the original
Vegetarian Enchiladas
Replace the chicken with a mix of sautéed bell peppers, zucchini, and black beans for a delicious vegetarian version.
Spicy Enchiladas
Add diced jalapeños to the filling or use hotter chili peppers in the sauce for an extra kick.
Common Mistakes to Avoid
Learn from others' mistakes for perfect results
- Not toasting the chili peppers enough, which can make the sauce taste flat.
- Overfilling the tortillas, which makes them hard to roll and can cause them to burst.
- Skipping the step of warming the tortillas, leading to cracking.
Meal Prep & Storage
Make Ahead Tips
You can prepare the chicken filling and enchilada sauce up to 2 days ahead. Store them separately in the refrigerator. Assemble and bake the enchiladas just before serving.
Leftover Ideas
Leftover enchiladas can be reheated in the oven at 350°F (175°C) for 15-20 minutes, covered with foil to prevent drying out.
Perfect Pairings
Serve this with...
Cooking Timeline
Cook the chicken breasts until tender and shred them.
Toast the chili peppers, blend the sauce, and simmer until thickened.
Sauté the onions, garlic, and chicken filling.
Assemble the enchiladas, pour the sauce, and top with cheese.
Bake until the cheese is bubbly and golden.
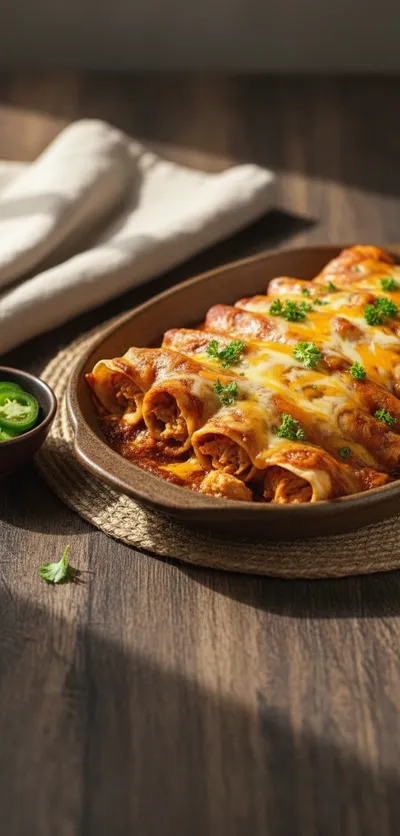
Chicken Enchiladas With Homemade Red Enchilada Sauce
Chicken enchiladas with homemade red enchilada sauce are a flavorful Mexican dinner, perfect for an easy and delicious family meal.
Timing
Prep Time
20 Minutes
Cook Time
30 Minutes
Total Time
50 Minutes
Recipe Details
Ingredients
For the Chicken Filling
-
01
2 lbs boneless, skinless chicken breasts
-
02
1 tbsp olive oil
-
03
1 small onion, diced
-
04
2 cloves garlic, minced
-
05
1 tsp ground cumin
-
06
1 tsp chili powder
-
07
Salt and pepper to taste
For the Homemade Red Enchilada Sauce
-
01
3 dried ancho chili peppers, stems and seeds removed
-
02
2 dried guajillo chili peppers, stems and seeds removed
-
03
2 cups chicken broth
-
04
3 cloves garlic
-
05
1 tsp ground cumin
-
06
1 tsp Mexican oregano
-
07
1/2 tsp salt
-
08
1 tbsp olive oil
For Assembly
-
01
12 corn tortillas
-
02
2 cups shredded Monterey Jack cheese
-
03
1 cup shredded cheddar cheese
-
04
Chopped fresh cilantro, for garnish
-
05
Diced onion, for garnish (optional)
Instructions
Preheat the oven to 375°F (190°C). Cook the chicken breasts in a pot of boiling water for 15-20 minutes, or until tender and cooked through. Shred the chicken using two forks and set aside.
While the chicken cooks, make the enchilada sauce. Heat a dry skillet over medium heat and toast the dried chili peppers for 1-2 minutes per side, until fragrant. Be careful not to burn them.
Transfer the toasted chili peppers to a blender. Add the chicken broth, garlic, cumin, oregano, and salt. Blend until smooth. Heat the olive oil in a saucepan over medium heat, pour in the blended sauce, and simmer for 10 minutes, stirring occasionally, until thickened.
In a skillet, heat the olive oil over medium heat. Sauté the diced onion and garlic until soft, about 5 minutes. Add the shredded chicken, cumin, chili powder, salt, and pepper. Stir in 1/2 cup of the enchilada sauce and cook for another 2 minutes.
Warm the tortillas in a dry skillet or microwave for about 30 seconds to make them pliable. Spread a thin layer of enchilada sauce on the bottom of a 9x13-inch baking dish.
Fill each tortilla with a spoonful of the chicken mixture, roll tightly, and place seam-side down in the baking dish. Pour the remaining sauce over the top and sprinkle with the shredded cheeses.
Bake for 20-25 minutes, or until the cheese is bubbly and golden. Let rest for 5 minutes before serving. Garnish with chopped cilantro and diced onion if desired.
Notes & Tips
-
1
For a shortcut, you can use rotisserie chicken instead of cooking your own.
-
2
If the sauce is too thick, thin it with a little more chicken broth.
-
3
To make this dish gluten-free, ensure all spices and broth are certified gluten-free.
Tools You'll Need
-
Large pot
-
Skillet
-
Blender
-
Saucepan
-
9x13-inch baking dish
-
Mixing bowls
-
Measuring cups and spoons
Must-Know Tips
-
Don’t skip toasting the chili peppers—it deepens their flavor.
-
Warm the tortillas to prevent cracking when rolling.
-
Let the enchiladas rest before serving to set the sauce.
Professional Secrets
-
Use a mix of chili peppers for a more complex sauce flavor.
-
Add a pinch of sugar to balance the acidity in the sauce if needed.
-
For extra richness, stir a spoonful of sour cream into the chicken filling.

Recipe by
Claire DuboisChef Claire Dubois is a pastry lover inspired by the elegance of French baking. She enjoys preparing delicate pastries, buttery croissants, and classi ...
Get Delicious Recipes Weekly
Join 25,000+ home cooks getting our best recipes straight to their inbox.
Free forever • No spam • Unsubscribe anytime